The biggest “gotcha”: resources/public. It turns out that figwheel loads everything from a hard-coded path. Remember though, I want to put all of my output under a .out/ path.
The fix is straight-forward: symlinks! That’s right, we are going to put in a super awesome (read totally crappy) hack:
resources/public -> ../.out/dev/app
Project.clj Updates
There are actually only a few updates that we need to do:
We need to add the plugins section with: [lein-figwheel “0.5.9”].
Then we’ll update the electron-dev section up with this: ["shell" "grunt" "symlink" "--source=.out/dev/app" "--target=resources/public”].
Add the resources folder to our clean-targets to clean up the hack: :clean-targets ^{:protect false} [".out" ".tmp" ".dist" "resources”].
Second, the open-urls section will automatically open a browser to the given URL. This is less handy for an Electron app, but since I want my code to run under both contexts, it can be useful.
The last thing needed is a top-level figwheel configuration setting:
The most important part here is the auto-clean section. Without this, all of your build output will get clobbered. Be sure to have it!
That’s actually it. Run: lein figwheel ui-dev (of course, you’ll need to build first: lein electron-dev) and you should get a browser window opened automatically for you. And running electron resources/public will open up Electron with figwheel ready to go.
Continuing in what has become a bit of a mini-series on ClojureScript with Electron, it’s time to review what we have and clean-up the prototype, flushing out the missing scenarios.
When I’m working on a project, especially in the exploration stages, I like to iteratively approach the problem and narrow down on the “sweet spot”. I’ve tried to do that with this mini-series exploration as well.
So, that begs the question: “what is the sweet spot?”
Honestly, I don’t think there is one. Rather, it’s the place where the trade-offs that you made to get you there are comfortable for you. At this point in the process, these are my dependencies:
Web-technology based app. This is a big one that I’m not completely sold on, but some of the positives include:
Great cross-platform support out-of-the-box.
Lots of great community support in various technical spaces.
Relatively future-proof.
Easy to hook up external scripting of my app through JavaScript or one of the many dialects. This is huge for my actual project I’m working on.
Reasonable performance ceiling for my needs.
ClojureScript – it compiles into JavaScript, and I can use Clojure on the backend sharing a lot of code.
Electron – this is the native app shell I’ll be using. It’s the major player in this space and has great backing.
Those are the big foundational dependencies. Switching out any of those essentially requires a complete re-write. Those are the ones to nail down first.
Next are the more transient requirements. These can be swapped out, though they may cause some pain.
Leiningen – This is the build tool for Clojure and ClojureScript, by extension. There are some others, but I see no reason to buck the norm here.
npm – This is the packaging tool for JavaScript. Now, there is actually a lot I do not like about npm. However… I can mitigate a lot of that, thus I see no particularly strong reason to ditch it.
Grunt – This is a very popular JavaScript task runner. But more importantly than that, it literally took me about 5 minutes to write my first set of scripts for it with this project. So ease of use was a huge win for me here.
Shell script – I have a single shell script. This means that my project will currently only build on macOS (technically, any Bash shell should work). It’s a very simple script though, so porting would take a manner of minutes.
These are not foundational even though they do encompass the very essence of being able to built out our project. They are not foundational though because each and everyone of them could be swapped out and the project could still be built. The project size will quickly dwarf the size of these components, especially if we use them wisely.
This bring us to ask the question: how are we using them? Not well. Another way to state it is: not in a very maintainable way. I’m very much of the philosophy that you don’t actually know the right answer right off the bat. If you do, it’s only because you’ve had the experience or training from someone else with that experience. Me, I’m new to this setup. What I have in the previous two articles are simply a way for me to explore the “how” of where I want to get. I know where I want to get, and now I’ve seen a path to get there. Now it’s time to clean up that debt so others can travel that same path in a more efficient and maintainable way.
Alias Cleanup
Currently the project has a bunch of aliases in the project. The problem is simple:
They duplicate existing functionality within Leiningen.
They duplicate existing build commands.
They do not scale well for both “development” and “production” uses.
Again, just to re-iterate: it’s not necessarily bad if this is what you have. I got here organically trying to figure out my needs. I see my needs now growing, so instead of accruing technical debt, I’m going to essentially refactor my build file.
electron-clean
The first to do is the electron-clean. We can already use the lein clean task to do this for us. The only thing we need to do is tell it which folders to delete in addition to its normal set.
:clean-targets [“.out” “.tmp” “.dist”]
That’s it. Now those folders will be deleted every time lein clean is done. The biggest benefit here is that people already familiar with Leiningen will immediately know how to clean up and get back to a clean state.
electron-main and electron-ui
Now, there might be a time where I only want to build one portion of my project… however, I can actually already do that by using the cljsbuild task anyway. So really, these are basically duplicating those commands.
The other problem: I want a dev and a prod version. I really do not want to be in the business of dealing with multiple versions of each of these. Instead, I’d rather just have: electron-dev and electron-prod. Those two aliases will build my project using my more granular build configurations: main-dev, ui-dev, main-prod, and ui-prod.
Of course, there are some more steps in there, but we’ll talk about those next.
Isolating Dependencies
If you remember from before, we have this strange interaction between Leiningen, npm, and Grunt each needing to know a little bit of information, and in some cases, we are even duplicating that information. There’s few things I hate more in a project that needed to update a project in multiple places to keep things in sync.
package.json
First up: package.json
Now, I said that npm is a dependency. However, the “one source of truth” for my project configuration is my project.clj file. That is the file that contains all of the information that should funnel down to the other tools. So instead of having a package.json that is checked in to our repository, let’s generate it!
Something to note up-front: I have a trade-off here. I went with ease of implementation on the script vs. full automation from within the project.clj file. I think this is more readable and slightly easier to maintain as well.
Basically, it just creates the package.json from a template specified in the file. The “ease of development” part is not having the devDepedencies passed in as a set of parameters generating the file. I don’t actually see this file changing very often, so I’m OK with this trade-off.
To use this, we’ll add a new alias: electron-init. So instead of cloning the project and running npm install, we’ll instead run lein electron-init. The great thing about this, in my opinion of course, is that we’ve essentially made npm an implementation detail. The public interface for working with our project is always a single tool: lein.
As you can see, it takes in a few configuration bits from our project file and passes it along to the script. After that, it runs npm install to get our project up and running.
The configuration for the electron bits looks like this:
However, I could not figure out how to make Leiningen happy to parse those values and pass them along to my script easily. Alas… a trade-off.
Symlinks
Now, previously we already handled the creation of the symlink. It looked like this:
[“shell” “grunt” “symlink”]
Easy, right? Well… yes. But it also hard-coded some information in the script. So again, if we wanted to make any changes to the output location of this, we’d need to go to another file and update that. This is something we should clean up, especially given that I will be calling this twice now: once for dev and once for prod.
Now Grunt is parsing out the command line parameters —source and —target.
Wrangling ClojureScript, Google Closure Compiler, and Electron
The next bit is more involved. This is actually something I found extremely frustrating. One thing I really dislike about tools is when they do “magic”. Especially more so when the output of tools gives you different ways to handle that output. That’s what happens here…
Here’s what the full cljsbuild description looks like now:
 :cljsbuild
 {:builds
  {;; The developement profiles contain no optimizations.
   ;; NOTE!! When optimizations are set to :none, then the :output-dir *must*
   ;; also be point to the `.out` location as these files will be referrenced
   ;; by the output file.
   :main-dev
   {:source-paths [“app/src”]
    :compiler {:output-to “.out/dev/app/goog/electron-deps.js”
               :output-dir “.out/dev/app”
               :target :nodejs
               :optimizations :none}}
   :ui-dev
   {:source-paths [“ui/src”]
    :compiler {:output-to “.out/dev/app/ui.js”
               :output-dir “.out/dev/app/lib-ui”
               :optimizations :none}}

   ;; The production profiles contain full optimizations.
   ;; NOTE!! When optimizations are set to something other than :none, then it
   ;; is safe to output the build collateral outside of the target location.
   :main-prod
   {:source-paths [“app/src”]
    :compiler {:output-to “.out/prod/app/electron/host.js”
               :output-dir “.tmp/prod/app”
               :target :nodejs
               ;; :simple is preferred so any externs do not need to be created.
               ;; Also, there is no real performance difference here.
               :optimizations :simple}}
   :ui-prod
   {:source-paths [“ui/src”]
    :compiler {:output-to “.out/prod/app/ui.js”
               :output-dir “.tmp/prod/ui”
               :optimizations :simple}}}
As you can see, there are basically the four different build configurations:
1.main-dev – builds the development version of our Electron hosting bits.
2.ui-dev – builds the development version of our app.
3.main-prod – builds the production version of our Electron hosting bits.
4.ui-prod – builds the production version of our app.
Build Output Location Matters
One of the first things to note is that the output-dir is different for each of the profile types. The reason behind this is when optimizations is set to :none, none of the JavaScript files are combined together. This means that we are required do deal with loading in all of the right files to start.
That’s dumb. I would have hoped that the required file would be created for us to load up all of the requirements, but alas, it’s not (or I simply couldn’t find it). Not the end of the world though, we can fix this!
The first fix is to put all of the “temporary” build output in the app folder. Just to reiterate, this is required because our electron-host.js file is going to need to reference these files individually so we need them local to the app assets.
The second fix is to actually put the electron-host.js in the app/goog folder. This is required as this is one of those “magic” things that you are just supposed to know. Hopefully you read all of the document before you started and didn’t try to just piece together and spend a bunch of time trying to figure it out…
In theory, you can specify a :main to handle a lot of this boiler-plate for you. However, I found that setting causes just as many other magic settings to tweak and was simply not helpful. Maybe I was just missing something though.
Electron’s package.json
Electron requires a package.json file to describe how the app bundle works. Now, we did generate this before. However, this time around, we are going to tweak it just a bit.
grunt.registerTask("generate-manifest", "Generate the Electron manifest.", function() {
    grunt.config.requires("generate-manifest.name");
    grunt.config.requires("generate-manifest.version");
    grunt.config.requires("generate-manifest.manifestDir");

    var config = grunt.config("generate-manifest");
    var json = {
        name: config.name,
        version: config.version,
        main: "./main.js"
    };

    var manifestFile = config.manifestDir + "/package.json";
    grunt.file.write(manifestFile, JSON.stringify(json, null, 2));
});
This time, we are going to hard-code the main values to ./main.js. We are going to do this so that both our dev and prod versions have the same basic structure.
Remember how I mentioned above that we need to load different content? Well, this is one of the ways that we are going to do it. Instead of having a single main.js file, we’ll have two versions that we can maintain. I put them under the app/hoist source folder.
Now, when we build each build flavor, we’ll copy over the correct version of our main.js.
Of course, the UI section is going to need a similar treatment as it also deals with the same basic problem from its compiled code. So instead of trying to generalize an index.html file, we’ll create two versions and copy over the right one.
index-dev.html
This file contains hidden or bidirectional Unicode text that may be interpreted or compiled differently than what appears below. To review, open the file in an editor that reveals hidden Unicode characters. Learn more about bidirectional Unicode characters
This file contains hidden or bidirectional Unicode text that may be interpreted or compiled differently than what appears below. To review, open the file in an editor that reveals hidden Unicode characters. Learn more about bidirectional Unicode characters
Now, we do have a little bit of duplication here. There are some other solutions we could do here, such as:
Generate the HTML content and run-time in our main.js file.
Create another single JavaScript file to load that handles the right includes.
Create an empty stub for lib-ui/goog/base.js for the prod flavor.
Generate the HTML content from a Gruntfile task.
Now, for my app, the long-term plan is to actually use https://github.com/weavejester/hiccup for all of my HTML. So I’m likely to just have a fairly empty HTML file like so:
This file contains hidden or bidirectional Unicode text that may be interpreted or compiled differently than what appears below. To review, open the file in an editor that reveals hidden Unicode characters. Learn more about bidirectional Unicode characters
And at this point, it seems just as easy to maintain these two HTML files vs. maintaining one of the proposed solutions above. Your mileage may vary, of course.
Wrapping Up
So I think that is about it. With these changes I’m now in a pretty good place with the setup of my project. I’m able to:
Well, that was short-lived. I don’t particularly like how NPM handles its dependencies. Basically, it flattens all of them exposing the inner details of the dependency graph to the project. Part of this is aid in sharing those dependencies. This is why I went with the Grunt task to download Electron.
But… often times, we need to make trade-offs. It’s always a trade-off to take a dependency on a project vs. write it ourself. This is one of those times where I simply want to take the dependency as its surface area is extremely narrow.
The dependency? electron-packager. This makes it extremely easy to package up our app into a proper distributable app bundle.
The side-effect from taking this dependency? We need to take the electron package from npm as well. This means getting rid of our Grunt task.
Just a brief aside… a little more explanation of why I don’t like this approach. I basically have a “hello world” app at this point. I have dependencies on Grunt, NPM, Le, Leiningen, and Electron. My node_modules directory is sitting at 210 dependencies and over 150 MB.
That is ridiculous.
Grunt Updates
First things first, we need to update the Grunt file to get rid of the download-electron bits.
Add in the electron-package alias to package up our app.
Update the output-dir for our library output.
The second step is required because the electron-package tool expects all of our content to be within the .out/app folder. This makes sense. Note that we also need to update our index.html file:
I cannot for the life of me get WordPress to render HTML properly, even if it is escaped…
This changes the reference location of our libs.
Project Cleanup
One thing you’ll probably run into is that rebuilds don’t always seem to work. This is especially true for HTML file changes. Let’s create a nice alias to help us out with that:
WARNING: This contains spoilers for the D&D adventure, Storm King’s Thunder.
The clock struck midnight, well, it would have if it weren’t for the only creatures manning the church bells being the corpses of fallen goblins and adventurers hoping to find reprieve from the battle only hours ago.
It would seem fortune would smile on the adventurers that night though as a friendly face would appear out of the darkness. A short, even by dwarven standards, figure named Ramakin would stumble in upon the group huddled in the bell tower of the church.
Feeling safe and somewhat confident of their situation, the group would attempt to wait out the night, hoping that the day would bring better fortunes. What they did not know is the town was infested with goblins, and the pile of corpses outside would be as sure of a sign as any that trouble was lurking inside.
Ramakin boldy took first watch. It was no help. Not once, but twice the goblins were able to ambush the group. Fortunately, the goblins were terrible shots with their bows and would only land a few arrows before being vanquished. The third wave of goblins came near the break of dawn. This time, however, they would not be caught unaware.
What was supposed to be a guarded night of rest turned into a restless series of combat as goblins patrolled the area. To make matters worse, Scarlett and Bastion were both brought to the brink of death.
As dawn finally broke, another figure loomed from the building across the way. Ramakin chased her down. Under the guise of a town monk, Kella convinced the players that she was just an innocent bystander. The only odd feature about her was a small flying snake that was wrapped around her forearm.
But the adventures would have no luck this day. Kella was not who she said she was, but rather a member of the Zhentarim. Shortly after meeting her, a large force of her friends entered on horse back through the lowered drawbridge. After some simple convincing, and an unfortunately embarrassing display of power by the leader on horseback, the adventurers agreed that their best course of action would be to head to the keep.
Xolkin, the leader on horseback, attempted to display his authority by throwing a dagger at a goblin the players had captured and tied up for questioning. However, this DM doesn’t do “scripted outcomes” and Xolkin missed.
Dutifully, a young lieutenant retrieved the blade, killed, the goblin, and handed a new blade back to Xolkin saying, “Sir, it seems your blade is woefully unbalanced. Here, take mine instead.”
I’m in the midst of doing some technical validation for a project that I’m working on. Based on the requirements, it’s going to have to be:
Cross-platform C++ with a “friendly” scripting language (yes, a C-plugin interface would be good, but it’s not exactly friendly).
Web-technology with a native host leveraging JavaScript (or a variant) as a scripting language.
I think for the performance that I’m looking for, a “native” web-app will be more than sufficient. I’m also taking the opportunity to finally do deep dive into ClojureScript. There are a lot of reasons why I made that choice, but those are out-of-scope for this post.
One thing I really try to do is to minimize dependencies. So whenever possible, I’ll get rid of them. I would rather know the debt that I’m creating up-front and know how to fix the inevitable issues that will arise, instead of getting broken mid-project pulling my hair out with little options left.
This is even more true with dependencies that introduce an architectural dependency. While things like React are great in their own space, I’m very cautious to introduce those into my projects that I plan on maintaining for years to come.
That’s a bit of preamble to give a little context why I’m not simply using tool like descjop for ClojureScript + Electron templates. At the time of writing this blog, the last commit was over 6 months ago. Again, not a dig at the author at all. However, it is something that I need to think about.
Getting Started
The first thing we understand is a bit how Electron works. I’ll leave that to the Quick Start guide. The important thing to note is that there are two processes that we need to care about:
Main Process – this is the code that is fed from the package.json file.
Renderer Process – these are the individual pages and their related JavaScript code.
Keeping in mind that I want to minimize dependencies as much as possible, I’m going to be creating two different targets relating to each of the process types. Because the renderer is the basic equivalent of pages being hosted by a server, we can decouple all of the main UI from the the hosting process.
Project Layout
I’m creating a “monorepo” for this project, so I’ll go ahead a layout my source as follows:
So… I’m actually using three dependencies here… yeah yeah.
Grunt – this is primarily used for easy downloading of the Electron distributable projects.
NPM – to download most of the dependencies and create a single npm install step to do so.
The lein build tool.
Java SDK – yeah… this is annoying. However, Clojure and ClojureScript require this to build.
The two folders represent the two targets that we’ll be creating:
app – this corresponds to the “main process” of Electron
ui – this corresponds to the “renderer process” of Electron
Gruntfile.js
This is an extremely basic Grunt file. All it does is download the Electron shell for us. This is also why I have no real concerns with adopting this. Even if the grunt-download-electron task stops working for some reason or another, this is “single-depth” dependency that can be easily swapped out with any other downloading tool.
The only other thing to note here is that I’ve factored out all of the details from this file, so if a new version of Electron comes out, there’s only a single place to update.
package.json
The only purpose for this file is to allow us to easily download the Grunt dependencies. It’s probably possible to integrate this into the project.clj file (the Leiningen build file), but I’ve not looked too much into this.
As you can see, the Electron data is stored in the config section under the electron key. Pretty straight-forward. The postinstall script is used to actually perform the installation of the Electron shell. There are two things of note:
There is a mkdir -p command as the Grunt task doesn’t actually create the intermediate folder structure. This is baffling to me as nearly all Grunt commands actually do this already…
I typically put all of my “built” or other output in hidden folders to help reduce the visible noise in the project structure.
As long as you already have npm, you can simply run npm install. This will download Grunt and it’s requirements and download the Electron shell for you.
Setting Up The Project
That gets us up and running and ready to start actually building our project now. A little bit involved, but not too bad.
Before we create the project.clj file, it’s important to understand the steps that we want to create. Also, it’s also important to note that the Leiningen tasks are really about atomic actions. We can use aliases to chain together multiple tasks.
So these are things we’ll want to do:
Generate a package.json manifest file. This is what Electron uses to know what JavaScript file to load.
Generate the app.js that is referenced by the package.json file. This simply loads the prerequisite libraries and the main entry point for the “main process”.
This is the base version of the file. Obviously, there are some holes to fill in, but basically it just sets us up to build using version 1.8 of Clojure and 1.9.456 of ClojureScript. The lein-cljsbuild is a plugin that adds the cljsbuild task to lein. Without it, we would only have the language .jar file (it’s a Java bundle) and no way to compile with lein.
Generate the Manifest
Next up is to generate the package.json file for the Electron bundle. You could skip this step if you’d like and simply have a hard-coded file as the contents is simply:
However, since I don’t like duplicating information, I’d rather just generate this file. Also, since we already have Grunt, this is a straight-forward process.
Add some additional details in our package.json file:
This enables us to actually try and build our project!
$ lein cljsbuild once main
Well… you’ll notice two things happen:
Nothing is compiled
A target directory is created
The first should be no real surprise as we don’t have any sources yet. However, the second is a bit more annoying. This target directory contains, what are essentially, a bunch of the intermediate output. Fortunately, you can move that if you’d like by providing an output-dir.
There is a very important thing to note here: for all of your build configurations, “main” in this case, each has to have it’s own unique output-dir.
I like to place all of my intermediate files in a .tmp directory that matches the output folder location.
Under the app/src folder, we are going to create our host.cljs file. This is the file that will ultimately be loaded into Electron in the “main process”.
This is basically a ClojureScript transcription from the Electron Quick Start guide.
Now when we run:
$ lein cljsbuild once main
You should see some output that looks like:
Compiling ClojureScript...
Compiling ".out/app/electron-host.js" from ["app/src"]...
Successfully compiled ".out/app/electron-host.js" in 10.542 seconds.
Hopefully you see that!
Create the Aliases
At this point, we actually have all of the components to launch Electron with our “main process”. However, let’s hook it all up so we don’t have to do any of the steps manually.
We’ll start off by creating an “alias” in our project.clj file:
Next, we need to add the following to our plugins list: [lein-shell "0.5.0"].
Adding this as a top-level key in our project file allows us to simply run:
$ lein electron-main
And get the following output:
Running "generate-manifest" task

Done.
Compiling ClojureScript...
Compiling ".out/app/electron-host.js" from ["app/src"]...
Successfully compiled ".out/app/electron-host.js" in 10.938 seconds.
Create the Main File
Lastly, remember we have that pesky main.js file that we still need created. We’ll create a task for that! Then we’ll add this to our new alias: ["shell" "grunt" "generate-mainjs"]
Over in our a Gruntfile.js we’ll need this:
grunt.registerTask("generate-mainjs",
  "Generate the Electron main.js file.",
  function() {
    grunt.config.requires("generate-mainjs.main");
    grunt.config.requires("generate-mainjs.manifestDir");

    var config = grunt.config("generate-mainjs");
    var content = "require('./" + config.main + "');\n";

    var manifestFile = config.manifestDir + "/main.js";
    grunt.file.write(manifestFile, content);
});
And you’ll need to add this configuration block:
"generate-mainjs": {
    main: "",
    manifestDir: ""
}
Now, this is mostly a by-produce with how Electron works. Based on the optimization settings, one of two different main.js files will need to be created. This is annoying, and this is something that we don’t want to ever think or care about. That’s why we are creating this task. We’ll need to create a different version for when the optimization value is :none, but for now, this works.
With all the updates, you should be able to do this now:
$ lein electron-main
And get:
Running "generate-manifest" task

Done.
Compiling ClojureScript...
Compiling ".out/app/electron-host.js" from ["app/src"]...
Successfully compiled ".out/app/electron-host.js" in 6.89 seconds.
Running "generate-mainjs" task

Done.
Testing It Out!
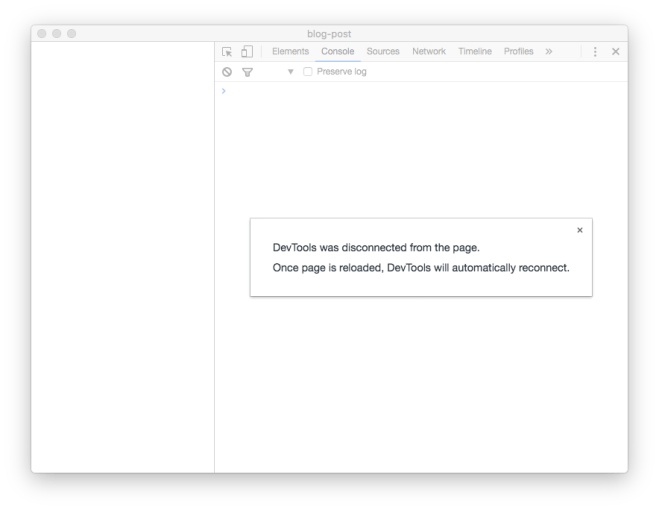
It’s finally time to test out that Electron is actually working!
This is the Electron shell with the devtools automatically opened. Now, at this point, you can see that it’s complaining that the devtools are disconnected. The reason for this is simple: you cannot debug the “main process” from within the Electron shell. You can only debug the “renderer process”, and since we haven’t loaded any HTML files yet, we don’t have any “renderer process”.
Creating the Renderer Process
When building a UI out a webapp, you basically have three components: HTML, CSS, and JavaScript. With Electron, it is no different.
The reason I set things up this way is that this allows me to easily copy over all of the “public” assets into the output location. Anything that needs to get built will go through a tool and live in a different folder structure.
Landing Page
The landing page will be super simple:
This file contains hidden or bidirectional Unicode text that may be interpreted or compiled differently than what appears below. To review, open the file in an editor that reveals hidden Unicode characters. Learn more about bidirectional Unicode characters
To handle this content, we need to publish the assets over. However, instead of copying over a potentially very set of content, we’ll simply create a symlink to the public folder. In order to that, we’ll need a new Grunt plugin, and we’ll need to add it to our alias of steps to do.
First, update our package.json file to add the dependency:
Next, we’ll update the HTML page to actually load and call the function:
This file contains hidden or bidirectional Unicode text that may be interpreted or compiled differently than what appears below. To review, open the file in an editor that reveals hidden Unicode characters. Learn more about bidirectional Unicode characters
As you can see, there are two new aliases created and a new ui build target.
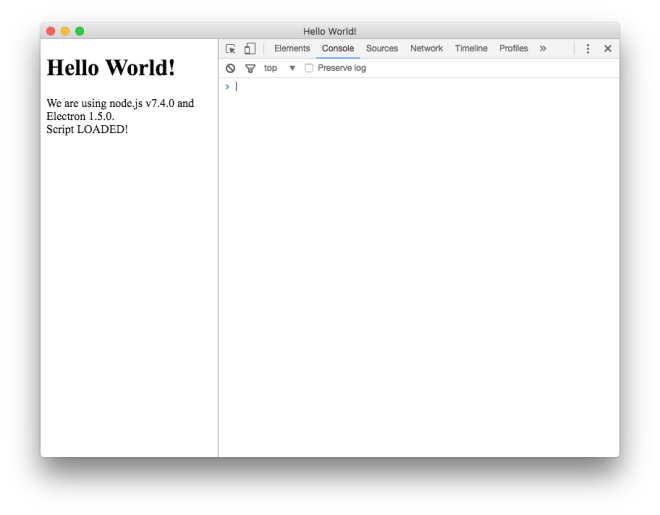
Now, when you build and run Electron, you should get this:
Electron with loaded script and devtools.
Conclusion
It’s easy to get bogged down in the details. However, the process is simply a set of rote steps:
Install our pre-reqs: Java and Leiningen.
Create the node package file to track our dependencies.
Create the Grunt configuration file to help us with some of the automation tasks.
Write the code for the “main process”.
Write the code for the “renderer process”.
When someone new to the project onboards, after the pre-reqs are installed, they only need to clone the repo and run npm install. After that, they’ll be up-and-running!
Now, I also did a few other things because I wanted to reduce the amount of places that needed to be updated. Right now, there are only two places that need to be modified for the basic configuration data: package.json and project.clj. I’m not really sure the best way to get rid of those duplicate pieces of information.
Also, there is still one remaining task: handle when :optimizations :none is true for the “main process”. That will have to come later as this blog post is already fair too long.
One of the hardest things about learning a new language is figuring out the idiomatic way of doing something in that language. That’s currently where I’m at while taking a stab at ClojureScript for a project that I’m working on.
The problem:
Imagine a piece of grid paper. Your job is to draw a map on that grid paper. Also imagine that when you place a wall, or rather, carve out a room from a solid wall, you actually carve out a section from each of the 8 surrounding squares as well.
Here is a visual representation of what I’m talking about:
There are basically a set of tiles stored in an array:
[ a b c
  d e f
  g h i ]
Each tile is composed of, what is essentially, a 9-bit integer where 0 is :floor and 1 is :wall.
The algorithm for carving out a wall is fairly simple:
Each corner has a bit-mask representation
The current value of the tile is bit-anded with the tile mask
The result is stored back in the array
For example, to set the value for the top-left corner, it might look something like this:
That’s not super great. It also doesn’t feel very “clojurey” to me, even though I don’t have a good idea of what that really means yet.
Aside: I really enjoy being able to use characters like ? and - in names of things… so much clearer!
Now… here’s the thing. This function actually works. So really, I could stop here and things would be fine. However, this code has a bunch of debt in it as there are essentially over 20 lines of code that have a lot of duplication in it.
Each call to assoc is going to create a new copy of the tiles for us: not great.
The index values have already been calculated once before in the let structure above.
The code is a bit hard to grok.
Removing Duplication
The first step I want to do is remove the index-offset calculations. To do that, I’m going to create a new function update-tile.
(defn update-tile
  [tiles row col f arg]
  (let [n (index-offset row col)]
    (assoc tiles n (f (get tiles n) arg))))
This is a function that takes in the vector of tiles, the row and column, a function f, and the argument to pass to that function. The first three arguments are pretty clear, but what is f? Well, f is the operation to do on the given tile: namely bit-and.
Why do I have this? Well… for placing a wall tile, I need to perform a bit-or operation and I’d like to generalize this function as it will apply to both scenarios equally well.
I still don’t know if this the “idiomatic way” of writing ClojureScript. Really, it looks a heck of a lot like how I’d write this in C++ or Swift. Sure, the syntax is a bit different, but it’s essentially imperative flow. I don’t know if that’s “right”.
However, what I do know is:
The code above gets rid of almost all of the duplication that I had before.
I’ve been pretty excited about the idea of Tesla for quite some time, but the Model S was simply not practical as I have a bit of a large family. The Model X was super intriguing, but oh so expensive. Then there was the Model 3.
Ok… still not super practical as a family car, but maybe it would be good for a daily commuter. My wife could drive it to the gym, we could use it for errands when we don’t need the kids to come with us, and it would make for a slightly better date night vehicle that either the minivan or the Jeep.
Announcement came, pre-ordered!
Of course, up to that point, I never actually took a serious look at any of the Tesla vehicles before. But hey, it was refundable.
So a good deal of time passed and I was back up in Bellevue. There is a pretty big Tesla store there; I figured this would be the easiest opportunity for me to actually go and check out a Tesla in person, especially the Model X as I’ve only see those while driving around town.
Wow… what a huge disappointment. Now, I know not everyone will agree with me, but I thought the styling of the vehicle was both very average quality, and for the case of the Model X in particular, extremely ugly. As one example, in the showroom Model S that I looked at, the gap for the wood trim piece that meets the plastic dash had a varying width gap like it was installed crooked.
Needless to say, for $70k starting prices, I expected a much greater attention to detail on the details.
As for the storage of the Model X… I was completely underwhelmed. The underhood storage in the front was much smaller than I had expected. Sure, it was a bit more than my minivan, but it surely didn’t seem to be a huge difference, more of a “nice-t0-have”.
I didn’t actually test drive one, so I have no feedback there.
At this point, I’m already starting to heavily re-think my pre-order purchase. I love the idea of a Tesla, but what I really want is the body of a Tesla car with the shell of a BMW.
Anyhow, then this happened:
Please read immigration order. Lmk specific amendments. Will seek advisory council consensus & present to President. https://t.co/qLpbsP4lEk
This was uncomfortable for me. Not because I don’t think he’s absolutely and 100% correct, but because he seems to value the pragmatic solution versus, what I consider to be the ethical choice, even if destined for failure.
For me, this made my choice easy now. Whenever possible, I try to make sure that my dollars are going to places that feel I can support on ethical grounds. This is not always possible, and I’ll freely admit that there sometimes exceptions that I make for various reasons or out of ignorance.
However, the Model 3 was already a luxury purchase. If I can’t vote with my dollars on luxury purchases, I’m know I’m not going to be able to do it with necessary purchases.
Does this mean I think you should cancel your pre-order? Of course not. You need to decide what is important to you.


You must be logged in to post a comment.