RetroBoy Advance – Power Indicators

The GameBoy Advance has a nice feature that when the batteries are getting low, the green “on” indicator changes to a “red” color.

So, how do we go about doing this? Honestly, as I start writing this blog post, I don’t know! Remember, I don’t know very much about this stuff at all. The only training I’ve had in electronics was back in high school. Hopefully at the end I’ll be able to come up with something that is working!

Iteration 0

I find that I learn best while exploring a solution through iterating over an approximate solution. The hope is that I can keep mutating my solution to get closer and closer to the real answer.

So, this is what I know: I want a battery indicator light. That’s simple enough!

Screen Shot 2016-12-27 at 8.43.23 PM.png
Power Indicator: Iteration 0 circuit design.

Simply hook up some power, a resistor (to limit the current going through the LED so we don’t blow it), and the LED to light up.

This is the base level.

Iteration 1

Now, for the next step, I’m going to need something a little more advanced. I know that I actually want two different LEDs: one green and one red. The green will be for “on with good battery levels”, and red for “on but battery levels are low”.

So, I also know one way to do this. The basic setup is to have two LEDs, two transistors, a power source, and a resistor hooked up.

Screen Shot 2016-12-27 at 9.18.32 PM.png
Power Indicator: Iteration 1 circuit design.


I have two power rails in the picture above:

  1. VCORE_MCP_5V – this is the 5V power rail that is created by the boost circuit.
  2. VCORE_BAT – this is the primary rail created from the batteries.

I need to use both here. I have two LEDs in parallel in the above circuit. My VCORE_BAT rail will only provide 2.4V~3.0V at max. Since many LEDs run on 2V, and since these are in parallel, I essentially need 2V for each of the LEDs. The VCORE_BAT rail simply cannot provide that.

Also, you can see that I’m using two transistors here. The goal is to be able to shut one of the gates based on a voltage level from the incoming VCORE_BAT rail to determine if the green or the red LED should be on. However, to do that, I still need to power the LEDs, and that will be done with the VCORE_MCP_5V rail.

Is this the right way to do it? I don’t know, but let’s see if we can make it work!

Testing This Stuff Out

Now might be a good time to talk about how I’m testing this out. I’m using a tool called EveryCircuit on iOS. It’s also available as a Chrome app as well. You can see this circuit here: http://everycircuit.com/circuit/6246606630551552.

circuit.png
The circuit under simulation using EveryCircuit.

Iteration 2

While trying out different things to see if the above is going to work, I realized that I’ll be needing something to compare two lines of voltages. To make that work, I needed to use something called a linear comparator. One interesting thing about a linear comparator is that you can have a positive or a negative voltage. Thus, I can essentially change the current flow direction.

This allows a setup like below:

Screen Shot 2016-12-28 at 11.12.32 PM.png

How did I come up with the MIC7221 as the linear comparator chip? Well, it was the cheapest on www.digikey.com at $0.27 per chip (at the time of writing)! I did have to do some research to determine the proper filters to use, so hopefully those are all correct.

The potentiometer (RV1) is a variable resistor that allows a smaller voltage to pass through depending on how open it is. This is great for this use case as I can adjust it to determine what I want to consider “low battery” (recall that a battery’s output voltage decreases as it becomes drained).

Here’s a link to the circuit to play with: http://everycircuit.com/circuit/5089351583399936.

Iteration 3

Now, as I was writing up the above, I realized that I was simply using the potentiometer as a voltage divider. Duh! In the final design, I don’t need to allow this to be varied. In fact, I don’t want to allow that as it would require more manual work. Instead, I simply want to hardcode the value with a voltage divider.

So here’s the updated circuit:

Screen Shot 2016-12-29 at 12.50.16 AM.png

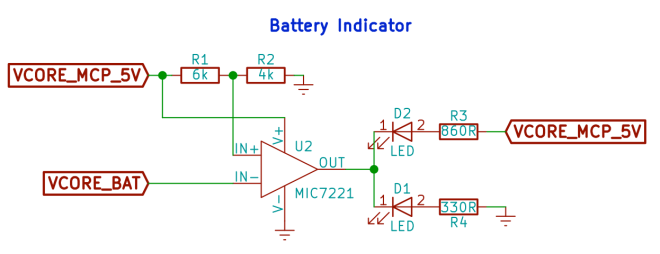
Here’s a link to the circuit to play with: http://everycircuit.com/circuit/6330686118297600.

I think this works, but I don’t know exactly how much power this will draw from the batteries. It’s possible that I might need to use something like a buck converter to make this more efficient. However, if my calculations are correct, it should only be drawing about 0.04~0.05 watts.

Milestone 1

So that’s it, I’m calling the power indicator circuit finished. It may need some more tweaks later, but I think this is a good start. In fact, I think the entire power circuitry is now complete.

Here’s the full schematic update:

Screen Shot 2016-12-29 at 12.54.10 AM.png

RetroBoy Advance – Power Indicators

RetroBoy Advance – Picking Parts

Ok, the schematic is done. Well, I actually made some tweaks to it, so it now looks like this:

Capture.PNG
Circuit for the DC-DC step-up converter.

The changes focus primarily around the addition of the switch (SW1). The PWR_FLAG items are simply for KiCad to understand where the power lines are coming from.

Drawing the schematic is the “easy” part, now it’s time to actually assign each of those generic parts a very specific part so I can actually order them to start testing things out!

So, head on over to digikey.com and start searching! Remember to reference your datasheets for your components. For example, in the MCP1642 datasheet, it tells you exactly what type of input and output capacitors you should be looking for. When you find the part you want, you can add these details to your components:

Capture.PNG

So, as you can see, I’m using a 10μF ceramic X5R in a 0603 package. Perfect! This will do two things for me:

  1. Defines the footprint for the pads (the exposed copper) where the component will sit.
  2. Provides the details I need to generate a bill of material (BOM) to actually place an order for everything.

Time to go through the rest of the schematic and getting things figured out.

RetroBoy Advance – Picking Parts

RetroBoy Advance – More Power!

One of the first things I need to take care of is dealing with power. I debated back and forth on whether to use AA batteries, a battery pack, a charger, or a combination of all of the above. As this is v1 of my prototyping, I decided to go with the simplest route: AA batteries.

For the prototype, I’ll be using a Raspberry Pi Zero. This device requires 5V to run (I think it can actually run on as little as 3.3V). So, we need to somehow get my two 1.2V 1900mAh Eneloop rechargeable batteries to provide 5V. To do this, I need to create a DC-DC step-up converter (e.g. a boost converter).

There are lots ways to do this. However, the more efficient ways (at least to my knowledge) all use chip regulators to facilitate in the process. Lots of companies make these. One way I find this stuff is by heading over to www.digikey.com.

For our purposes, we know we want the following:

  1. Surface mount component
  2. The 8-MSOP package (basically exposes the pins for easier hand soldering)
  3. Maximum output voltage in the 5~5.5V range
  4. A step-up function regulator

That gives is basically this query: 8-MSOP, 5.5V max output, surface mount, step-up regulator. As you can see, there are basically two manufacturers that supply what I need (there are probably many others at different supplier sites).

At this point, I actually just when to the two websites and looked at the different chip offerings. There is a Microchip version that is gives me the constant 5V that I need. Why Microchip over ST? Well, I simply liked their docs and website better. ¯\_(ツ)_/¯

So, I went with the Microchip MCP1642B-50 chip.

If you look at their datasheets, they provide a lot of great information, including some very typical usage schematics. Perfect! I loaded up KiCad EDA (I tried a bunch of different software, this was the one I settled on) and started sketching out the first schematic, which is basically just a transcription from the data sheet.

power-regulator.PNG

Now, please be advised. I only have the most basic understanding of how this thing works, so please keep that in mind. 🙂

The other thing I really liked about the Microchip product is that it provides a mechanism to model out the circuit to make sure things are looking kosher.

RetroBoy Advance – More Power!

RetroBoy Advance, Kick Off

For Christmas, I wanted to create a portable gaming emulator for my kids. Now, there are a ton of tutorials out there, I even bought all of the parts to build out the PiGRRL Zero. I borrowed a 3D printer and printed out some samples… wow did they suck.

There are some nice 3D printers on the market, but there’s simply nothing within my price range that is going to be able to create something as nice as the original GameBoy Advance case – which, side note, is in my personal opinion, the best handheld form factor ever created. Seeing as how I can purchase one for about $10 with the proper buttons, it was time to rethink what I was building.

Now the goal is to figure out how to get all of this to fit properly within a GameBoy Advance case… I searched the interwebs for anything and game up with the realization that I’m going to have to create my own PCB, like this awesome example.

Why not simply use that one? Excellent question! The biggest reason is that for my GameBoy Advance clone, it absolutely must have the old-school cartridge feel. I think modern day gaming (and life in general) is really missing out on a lot of the tangible feel.

So, instead, I’ll use this as a good teaching experience for my oldest daughter and myself. I haven’t built a circuit board since high-school, and that was some pretty basic stuff.

I’ll be posting our journey here for those that may find this interesting. However, since I’m not an EE (electrical engineering) major, have no training in the field, and pretty much know nothing about what I’m doing, don’t expect too much epicness. 🙂

RetroBoy Advance, Kick Off

Mistakes Were Made

My family has been waiting for our new home to be completed here in San Luis Obispo. We finally started the move in process, which is never fun. I’m setting up my office and I’ve realized that I made a pretty stupid mistake – not enough power!!!

We bought a new construction home, so we had the option to run additional power while they were framing the house. We added one for a fridge in the garage (a family of 6, soon to be seven!) and a microwave in a pantry closet. I didn’t even think about my office. 😦

I just recently purchased a soldering station, flipped it over to check out the power requirements: 6A. That’s when it hit me – why oh why did I not run an additional circuit to the office!?!

My office has a 15A circuit on it, which supports a max of 1800 watts. Of course, you really should only have your circuits running at 80%, so that leaves 1440 watts for me to use.

Here’s my list of stuff (plus my wife’s as we are sharing it as a craft room / office):

Device Max (watts)
2013 Mac Pro 205
Main PC 200
Secondary PC 200
5k iMac 197
2011 iMac 170
Xbox One 120
Sewing Machine 100
Skiva USB Charging Station 84
Sony TV 75
Mackie Speakers 72
Soldering Iron 70
Dell 34″ UltraWide 55
Heat Gun 50
StarTech Drive Enclosure 48
Cricut 45
Samsung Monitor (purchased before my boycott started…) 36
Sony Soundbar 34
MacBook Charger 29
HP Printer 25
Yamaha DGX-650 13
Raspberry Pi Charger 12.5
Netgear Switch 12
Cable Modem 7
Eero 7
Apple TV 1.9
Total 1868.4

Well, crap.

There is some good news:

  1. These are all estimated peak wattage usage numbers, and
  2. Not all of these devices will be used simultaneously.

Moral of the story: always plan ahead for your power usage needs.

Mistakes Were Made